Solar Greenhouses
L. David Roper
http://www.roperld.com/personal/roperldavid.htm
28 April 2008
Slide Show for this web page
YMCA of Virginia Tech Solar Greenhouse Project
Contents:
Introduction
Global Warming and Peak Oil require that humans acquire their food from local farmers or grow it themselves. In climates with cold winters, such as Blacksburg Virginia where I live, acquiring local food in the winter time requires the existence of solar greenhouses. Of course, one could preserve summer crops by canning and drying, but fresh vegetables in winter months would make a healthy diet more likely.
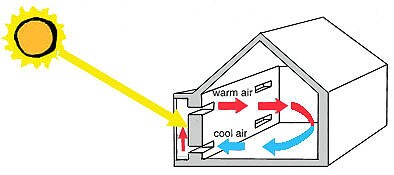
Solar greenhouses (SGH) differ from standard greenhouses in that energy is collected from the Sun and stored for use when the Sun is not shining. Greenhouses tend to get too hot when the Sun is shining and too cold during winter nights. A solar greenhouse stores energy in some medium other than the air during sunny weather. The best solar greenhouse cools the air as needed when the Sun is shining as well as heats the air when needed. This process of cooling and heating needs to be done with a minimum of energy input from external sources other than the Sun.
From my studies of solar greenhouses, I have concluded that the best method for storing and releasing heat in solar greenhouses is the Subterranean Heating and Cooling System (SHCS) described below. In a nutshell the SHCS method is able to store a large amount of energy in the rocks and soil under the planting beds by condensing water vapor in hot moist air into water, with much released heat that is then stored in rocks, soil and water under the planting beds.. That is, hot moist air from the SGH enters the rocks/soil at one end of the SGH and cool dry air comes out of the rocks/soil at the other end. When the SGH air is cool and dry, the reverse occurs. The high water vapor (humidity) in the SGH comes from the transpiration of the plants; 90% of the water that enters the roots of plants is transpired from the leaves as water vapor into the air. Much energy is expended by plants to extract water from the soil, use it to carry nutrients up to the leaves and to convedrt to convert liquid water to vapor out of the stomata of the leaves. The SHCS stores much of that energy in the rocks/soil under the planting beds by condensing the vapor back into water. The SHCS is an integrated system that involves the plants in the process of maintaining more constant temperature and humidity in the SGH. Another way to describe the SHCS is that it is a man-made "weather system" that provides advantageous "weather" to the air around plants, cooling it and reducing the humidity when needed and heating it and increasing the humidity when needed.
If local farmers cannot afford to own solar greenhouses on their farms, a community solar greenhouse could lease out space to local farmers in the winter time. Or a neighborhood solar greenhouse could be constructed and managed by a neighborhood to grow their winter vegetables. Below I sketch plans for a 18' x 32' cooperative or neighborhood SGH using SHCS.
Some families may want a smaller SGH in their back yard. So, I also sketch plans for a 10' x '20' (or shorter) back-yard SGH using SHCS. This smaller greenhouse is a good approach as a test SGH using SHCS.
A SGH may be to hot to use in the peak summer time. However, the SHCS SGH described below cools the greenhouse during hot weather, which may allow use in the summer time. In any case, a solar greenhouse can be used to start transplants for an early outside summer garden and transplants from an outside garden into the greenhouse in late summer or early fall.
This document contains much information gleaned from many sources, both from the Internet and from books, about designing and building the most efficient solar greenhouse, especially one that uses a Subterranean Heating and Cooling System (SHCS). Internet links are underlined.
Skip ahead to a sketch of a SHCS solar greenhouse for Blacksburg, Virginia.
- The Solar Greenhouse Book by James C. McCullagh, 1978.
- Solar Greenhouses: Underground by Daniel Geery, 1982.
- Home Solar Gardening: Solar Greenhouses for Your House, Backyard or Apartment by John H. Pierce, 1992.
- The Earth Sheltered Solar Greenhouse Book by Mike Oehler, 2007.
Internet links about photosynthesis and transpiration
Internet links about solar greenhouses
|
|
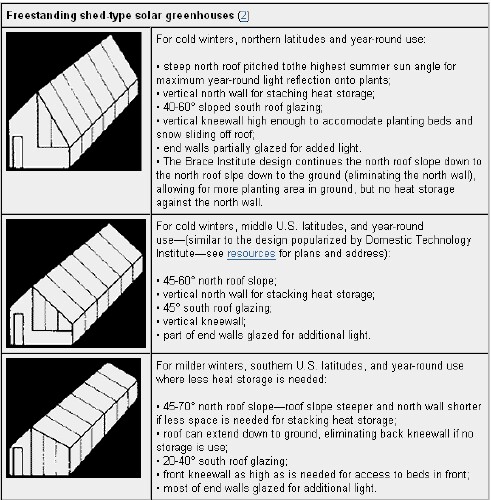
|
|
- It should be about twice as long (east to west) as it is wide (north to south).
- Its peak should be about as high as the building is wide.
- The slope of the south glazed roof should be about equal to the latitude plus 20° or slightly smaller.
(Solar Greenhouses: Underground book, p.88, states "plus 8°", but that is for an underground greenhouse.)
- Use two layers of glazing.
- All non-south walls should be insulated.
- The slope of the north insulated roof is not critical. 60-75° works well for the U.S. and southern Canada.
(Solar Greenhouses: Underground book, p.91, states "24°", but that is for an underground greenhouse.) See sketch below.
- The north wall should be painted white or covered with a reflective material.
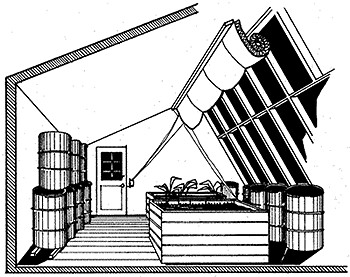
- Water is the best storage at about four gallons per square feet floor area. (1 gallon = 0.1337 ft^3 or 1 ft^3 = 7.48 gallons, so 4 gallons = 0.5347 ft^3. So, about 1/2 ft^3 water for each ft^2 of floor area.)
- Rectangular 5-gallons cans are better than 55-gallons drums because of the better thermal contact between them and minimal stratification.
- Add a rust inhibitor to the water.
- Insulate the walls and north roof at about the same amount as for an energy-efficient home.
- Use foam insulation outside the foundation to a little below the frost line, which allows the greenhouse soil to store heat.
- Use an insulating curtain over the south wall at night, reflective on the inside and tight fitting at the edges.
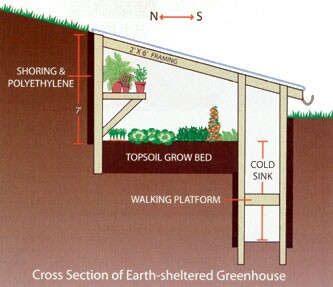
- Use large growing beds 18 inches deep on the floor instead of containers on benches.
Sketch from p.22 of The Solar Greenhouse Book. " The extreme case is a horizontal ceiling; a greenhouse with an insulated north roof would be little better than a room with south-facing picture windows. The only region where you might wish to consider rear/north slopes much less that 60° or so is where overheating is a serious problem, as in parts of the South and Southwest. No matter what your location or the slope of your north greenhouse wall, you should make the inside surfaces reflective. Experiments done on plant growth with reflectors indicate that vegetable production is enhanced to a greater extent with diffusing white reflectors rather than specular reflectors, like aluminum foil, or non-reflectors, like black walls." |
- Rely primarily on natural ventilation for summer cooling.
- Have a vertical knee wall on the south high enough for planting beds and for snow sliding off.
- Diffuse-light glazing provides more even lighting than clear glazing.
- Use 0.75 ft^2 to 1.5 ft^2 of glazing per square feet floor area.
- Double-wall rigid polycarbonate is probably the best glazing material, but may be more expensive than other options.
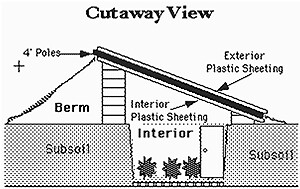
- Building a berm up on the north wall will help with its insulation.
- Brick, masonry or flagstones for the floors add to heat storage.
- Heat air at the greenhouse peak and pump it into the pipes in the growing beds at night to heat the soil.
Continue the pumping at night to heat the air.
|
|
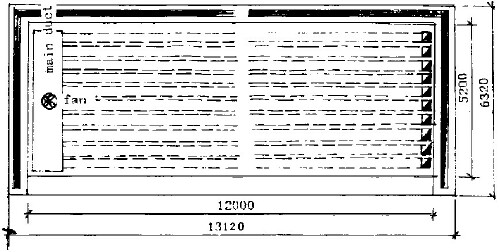
Subterranean Heating and Cooling System, SHCS, in China
(Pipes for condensing and evaporating water under planting beds.)
Developed in China.
- Rectangular clay-brick ducts ( 0.6" x 0.5") are laid east-west 20" deep 20" apart in planting beds.
- They are connected to a lateral duct (20" x 28" for ten east-west ducts) on the east wall covered with boards tightly with a fan in the middle. The fan has an outlet/inlet into the greenhouse air.
- The air from the ducts exits into the greenhouse air through vertical ducts on the west end.
- The fan is 370 watts, 2800 rpm, 1930 cfm for ten east-west ducts, and is controlled by two thermostats. It consumes about 3 kWh/day for ten ducts.
(It could be powered by a 1 kW solar-panel set or a 1 kW wind turbine with battery storage.)
- When the greenhouse air temperature reaches about 20° C (68° F) thermostat #1 turns the fan on to pull air into the underground ducts to condense water below the planting-beds soil, thereby storing heat in that volume, and then out of the vertical west ducts to cool the greenhouse air. The air emerges cooler and dryer.
- When the greenhouse air temperature lowers to slightly above 15° C (59° F) thermostat #1 turns the fan off..
- When the greenhouse air temperature lowers to about 10° C (50° F) thermostat #2 turns the fan on to pull air into the underground ducts to evaporate water under the planting-beds soil, thereby releasing heat from that volume, and then out of the vertical west ducts to warm the greenhouse air. The air emerges hotter and moister.
- When the greenhouse air temperature raises to slightly below 15° C (59° F) thermostat #2 turns the fan off.
- The heat stored by condensation and released by evaporation of water in the area below the planting-beds soil is about 500 times the heat that can be stored in an equivalent amount of water up 1° C without using water phase change.

Research on the temperature environment of solar greenhouse (an MS-Word version of the Chinese paper)
Advantages:
- Planting-bed temperature has a smaller range of variation.
- Greenhouse air temperature has a smaller range of variation.
- Moisture condenses in the clay ducts and, thereby, reduces the temperature and humidity of the greenhouse air when it is too hot and humid.
- Moisture evaporates in the clay ducts and, thereby, increases the temperature and humidity of the greenhouse air when it is too cold and dry.
- Air flows slowly all around the greenhouse, making for more uniform temperature and carbon dioxide distribution.
- The payback time is very short (about 2 years compared to the duct lifetime of about 15 years, 5 years for the fan).
The fan could be powered by a 1 kW solar-panel set or a 1 kW wind generator charging deep-cycle batteries and a DC to AC inverter.
|
- Uses thin-walled 4" corrugated, perforated, flexible polyethelene drainage tubing (ADS = Advanced Drainage System) instead of clay bricks for the long east-west pipes. Uses 6' of pipe for every 4 ft^2 of planting beds. They are in three layers 2' apart horizontally and 1' apart vertically. (For a SGH of sides a & b: 6 x area / 4 = 3ab/2 feet of pipes; three layers of pipes every 2' horizontally: 3 x b x (a / 2) = 3ab/2; in agreement. However, there is a large pipe at the west end and needed distances from foundations, so the total length of the drain pipes is less than the prescribed length.
- FAQ about SHCS
- "Does mold or mildew establish itself in the underground duct work over time?:
No, using heavily perforated tubing, and 4" size, the soil microbes influence the tubing zone so intimately that foreign mold doesn't have a chance to get established. Circulating organically laden air might be different though. So, air from composting and animal housing might be a problem; it could provide the nutrient to get something going that is unusual in normal soil strata. I've never seen problematic mold in normal scenarios."
- 55-gallon plastic drums to plug the tubes into, one for each fan and exhaust location instead of one exhaust for each east-west tube.
- Since the tubes are flexible, they do not have to be strictly east to west. Here is an example of a possible tube layout around a central hpond; cross-section profile.
- 2" rock covers the tubes to absorb the heat instead of clay bricks absorbing the heat.
- Move 5 times the air volume of the greenhouse through the subterranean pipes every hour, but do not exceed 4 ft/sec in the pipes.
- Cover the rock/water heat sink with a perforated vapor barrier; e.g., a tarp with 1/4" holes drilled in a 4" grid.
- One Grainger duct fan for every 1200 ft^2 of greenhouse.
- Electrical layout.
- YouTube videos of how to build the American version of the SHCS system
- Download a slide show of an installation of the American SHCS
- Duct fan used in the American version of the SHCS system
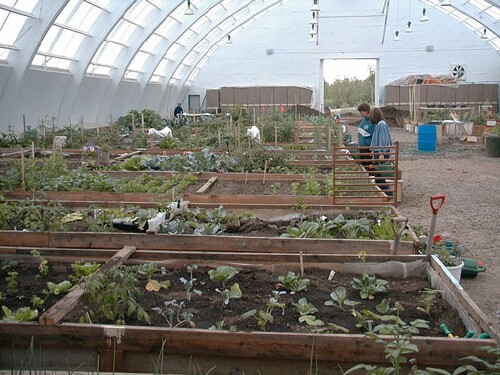
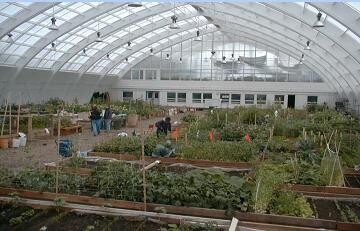
- Several SGH in the mountains of Colorado and Arizona and in Canada use SHCS.
|
Studies of SHCS
|
|
Glazing angle for a Solar Greenhouse in the New River Valley VA
The Earth's axis tilts at an angle of about 23.5° from its orbiting plane about the Sun. The New River Valley of Virginia is at about 37° latitude. Therefore:
- At summer solstice, the roof angle to intercept the Sun's rays at perpendicular is 37° - 23° = 14°.
- At winter solstice, the roof angle to intercept the Sun's rays at perpendicular is 37° + 23° = 60°.
- At spring and autumn equinoxes , the roof angle to intercept the Sun's rays at perpendicular is 37°.
- The average of equinox and winter solstice: (60° + 37°) / 2 = 48.5°.
- I choose a 50° glazed roof for a small greenhouse to increase the peak height and to gather more of the Sun's energy between the equinoxes and the winter solstice.
- I choose a 45° glazed roof for a large greenhouse to minimize the peak height.
|
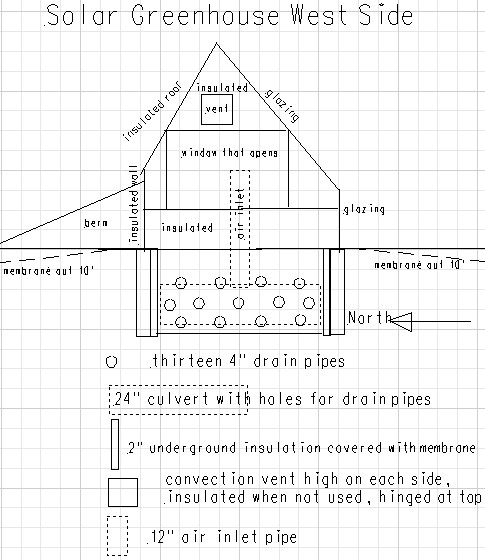
Sketch of a SHCS SGH for Neighborhoods in the Middle-Latitudes USA
by L. David Roper (roperld@vt.edu)
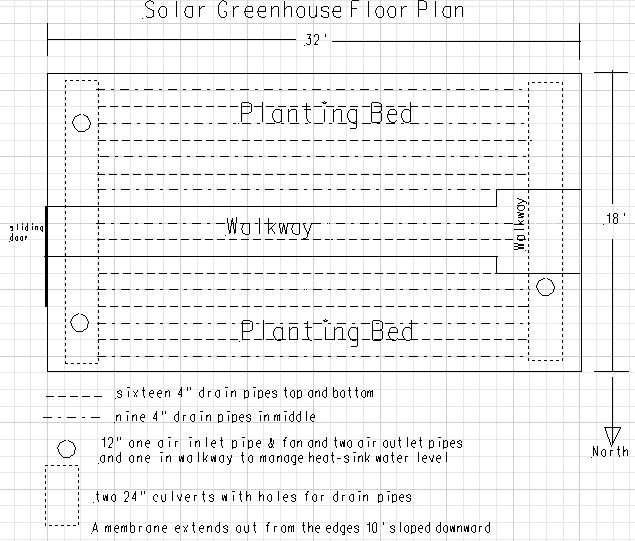
Floor area = 576 ft^2; planting beds area = 494 ft^2. (Conventional water heat storage at 4 gallons per ft^2 = 2304 gallons.)
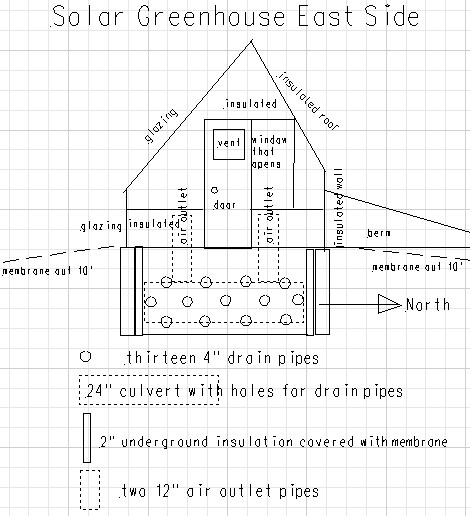
Note the vertical pipe on the right to pull air into the 25 underground drain pipes and the eight vertical pipes on the left to return the air to the greenhouse after it has either condensed water under the beds to reduce air temperature and humidity in the greenhouse or evaporated water under the beds to raise air temperature and humidity in the greenhouse. |
Air volume = about 4750 ft^3.
South glazing slope is 45°. North roof slope is 60°. If the pipes volume (3.5' x 15' x 32' = 1680 ft^3) were completely filled with water, it would hold 12,567 gallons.
The walkways could be slightly recessed (1' to 1.5') to make it easier to work on the beds. Recession of about 1.5' would place the walkway at the top of the heat sink.
Note that the only external power required is to run the fan to force air into the ducts under the planting beds, for outlets for any electrical tools to be used and, possibly, for lights for nighttime work.
|
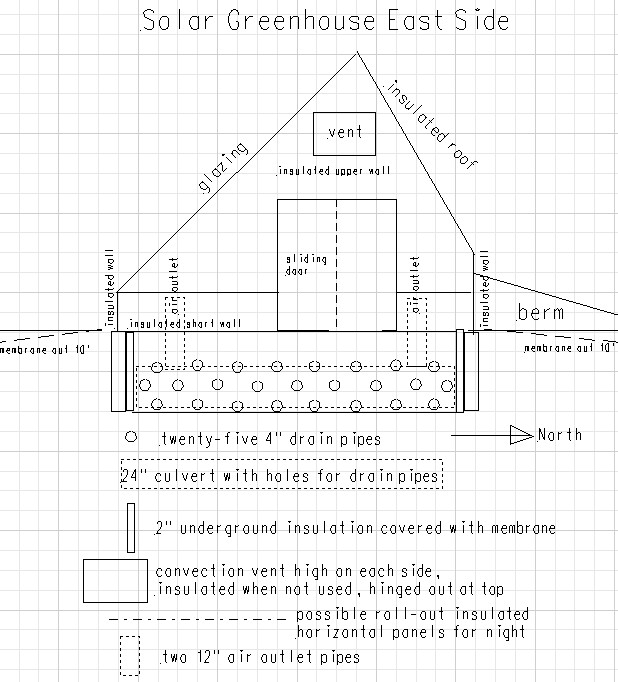
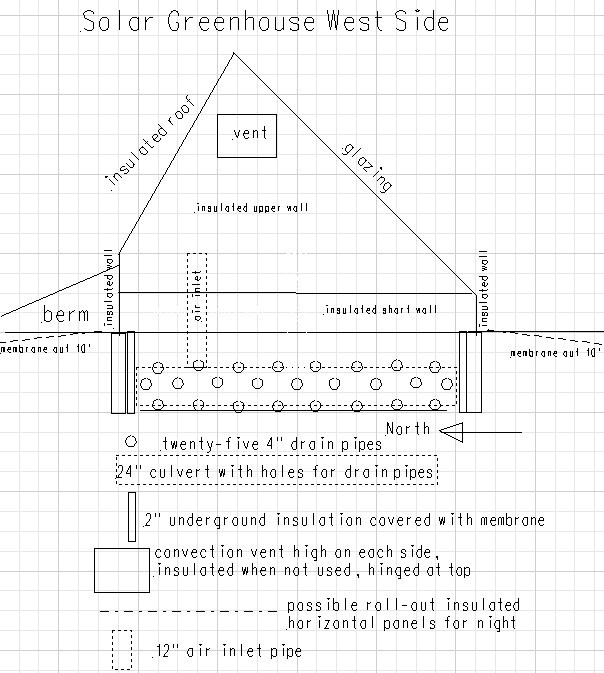
The two air outlets should be aimed parallel to the glazing and the roof. Note the possible night-time roll-out horizontal panels between the door and the vent to keep hot air from collecting in the peak at night.
|
Some details:
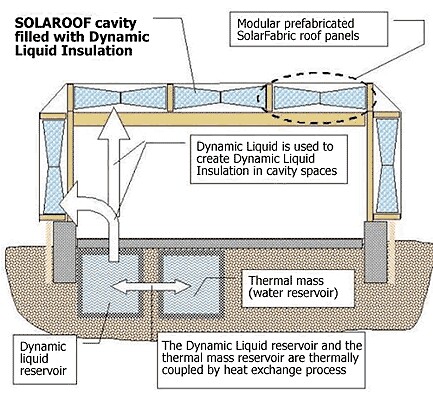
Traditional solar greenhouses use water and/or rocks to store energy to be released later when needed. The SHCS SGH described here uses wet rocks and soil to store energy under the planting beds and walkways. When the SGH air is hot and humid, it is pumped through the drain pipes under the planting beds and walkways where the water vapor condenses into warm liquid water which then percolates into the rocks and soil, heating them and the accumulated water.
Since 970 times more energy is released when water vapor condenses that when water is cooled by one degree fahrenheit, much more energy can be stored by the SHCS method than can be stored by just heating liquid water, rocks or soil.
When the SGH air is cool and dry, it is pumped through the drain pipes under the planting beds and walkways where the liquid water evaporates making the emerging air hotter and more humid. An additional benefit of the SHCS system is that the SGH air is slowly moved from the east end to the west end, making the temperature and carbon-dioxide concentration more uniform.
- Orientation:
- The best orientation is with the glazing toward geographical south. (In Blacksburg VA magnetic north is about 6.5 degrees west of geographic north, so magnetic south is about 6.5 degrees east of geographic south.)
- Next best orientation is with the glazing slightly toward the east to capture energy from the morning Sun.
- A wind shelter on the north side, to reduce wind flow, reduces infiltration and outfiltration of air.
- Foundation:
- Place 2" of termite-treated extruded polystyrene or extruded polyurethane outside the foundation.
- Walls and roof:
- The short south glazed wall could be higher, which would make the north insulated roof longer and the peak higher.
A main reason for its existence is because of the possibility of snow sliding off of the glazing.
- The north, east and west walls are 2" x 6" full of insulation with staggered 2" x 4" studs to reduce heat conduction through the studs. A 4 to 6 mil vapor layer is on the outside under the siding.
- Some of the dirt removed for the drain pipes and the walkways could be angled against the back wall outside a vapor layer to create a berm for insulation, as shown in the diagram.
- The north-facing roof is 2" x 6" full of insulation. the glazing would be attached to 2" x 4" rafters attached at the peak to the 2" x 6" roof rafters.
- The insides of the insulated walls and roof are painted white to reflect light back to the north sides of the plants.
- If the walkways are recessed up to 1.5', the short planters-walkways separation walls are made of wood.
- Structural calculations need to be done for the south sloped glazing and the north insulated roof. Probably a post or two in the middle of the greenhouse will need to be located at the point of their meeting at a peak beam.
- Door and possible air lock: The door is on the east side, the usual leeward wind side, to reduce air infiltration. An antichamber could be built outside the door to further reduce infiltration and for tool storage.
- Summer venting: Put insulated vent doors high on the east and west ends, hinged at the top and screened, to allow summer-time natural venting of hot air while keeping rain and insects out.
- Walkways:
- The walkways could be recessed up to 1.5' to makeit easier to workthe planting beds. The crusher-run used to surround the upper pipes is probably sufficient for the walkways cover. A concrete or flat stone cover could be added later.
- Glazing:
- There could be some glazing on the south portions of the east and/or west sides, particularly on the east side to capture energy from the morning Sun after the coldest part of the night.
- The areas of the east and west sides that are not glazed should be insulated.
- I have not tried to design a removable insulating cover for the glazed surfaces; advocates of the SHCS indicate that such is not necessary. However, if glazing exists on the east and/or west sides, it would be easy and efficacious to devise removable insulating covers for that glazing. A bottom-hinged insulating outside cover for the short south vertical glazed wall could be added, painted white on the inside to reflect sunlight into the SGH when in the down position.
- Soil/Rock/water heat storage:
- A perforated vapor barrier (4" grid) is placed over the rock/water heat sink.
- Place 2" of extruded polystyrene or extruded polyurethane (treated for termite exclusion) at on the sides of the trench that will contain the drain pipes.
- Put 1/4" screening over the inlet and outlet air pipes.
- Carbon-dioxide balance:
- Encourage micro-organism and worms in the soil. Regularly bring in fresh compost full of worms.
- Perhaps have a frog colony and/or a fish tank in the SGH. (Some keep rabbits in cages in a SGH.)
- Use candles for lighting night-time work in the SGH.
- Opening the door for entrance and exit of workers will allow some air exchange.
- On hot days open the vents for some natural air exchange.
- Air flow to and from rock/water heat sink:
- To move 5 times the greenhouse volume (4750 ft^3) per hour through the pipes requires a fan that that is rated at about 395 cfm (ft^3/minute).
- Do not exceed more that 4 ft/sec in the 4" drain pipes. For the twenty-five 4" drain pipes, that air flow is about 500 cfm; so 395 cfm is ok.
- The two items above allow a 400-500 cfm fan to be used.
- Many other details are yet to be worked out, some of which are:
- The exact details of the roof rafters, including any center poles that may be needed for structural integrity.
- The sizing of the polycarbonate glazing panels.
- The measures to prevent infiltration.
- Determine the most environmentally-friendly materials to use in the construction.
|
| To make a 36' x 64' solar greenhouse would make the roof peak too high (about 23'). It would be better to keep the width at 18' and make the length 64' or just make two 18' x 32' greenhouses with a north-south alley between them. |
|
Sketch of a SHCS SGH for Back Yards in the Middle-Latitudes USA
by L. David Roper (roperld@vt.edu)
Floor area = 200 ft^2; planting-beds area = 163 ft^2. (Conventional water heat storage at 4 gallons per ft^2 = 800 gallons.)
The length could be reduced to 16' or 12' to fit the property.
Note the vertical pipe on the right to pull air into the 12 underground drain pipes and the four vertical pipes on the left to return the air to the greenhouse after it has either condensed water under the beds to reduce air temperature and humidity in the greenhouse or evaporated water under the beds to raise air temperature and humidity in the greenhouse.
|
Air volume = about 1340 ft^3. The south glazed slope is 50° instead of 45° to yield more height; the north roof slope is 60°.
If the pipes volume (3.5' x 7' x 20' = 490 ft^3) were completely filled with water, it would hold 3,665 gallons.
The walkway could be slightly recessed (1' to 1.5') to make it easier to work on the beds.
Note that the only external power required is to run the fan to force air into the ducts under the planting beds, for outlets for any electrical tools to be used and, possibly, for lights for nighttime work.
|
|
Air flow to and from rock/water heat sink:
- To move 5 times the greenhouse air volume (1340 ft^3) per hour through the pipes requires a fan that that is rated at about 110 cfm (ft^3/minute).
- Do not exceed more that 4 ft/sec in the 4" drain pipes. For the twelve 4" drain pipes, that air flow is about 250 cfm; so 110 cfm is ok.
- The two items above allow a 110-250 cfm fan to be used.
|
| The surface to volume ratio for a small greenhouse is larger than for a large greenhouse, so heat loss will be greater through conduction and radiation at the walls. Therefore, if the small back-yard SGH sketched here allows growing food in the winter time, a larger one will certainly be successful. If it turns out to not store enough energy for growing throughout the winter, more heat storage (water) can be added inside the north wall. The small back-yard SGH is a good test case to build first. |
|
Action Plan to Build a SHCS SGH
|
-
Determine the structural details for the SGH.
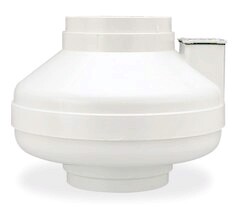
-
Determine the air-flow fan and the two fan thermostats needed for the SGH.
-
-
Identify a suitable location to build a test SGH. It must be free from any shade on the south, east and west sides and digable to 4.5'.
-
Obtain funding to build a test SGHBY.
-
Lay out the SGH.
-
Scrape off the top soil down to 1.5' below the surface over the area to be dug out for the underground pipes; cover the soil to keep water out.
-
Dig out the volume for the "basement" walls and the underground pipes down to 4.5' below the surface and for the cistern. Save the soil.
-
Put in foundations for the posts for the roof, if needed. (Perhaps two posts for the neighborhood SGH.)
- Run the concrete footer and lay the blocks (or run the concrete) for the "basement" walls.
- Put in a drain pipe at the outside bottom of all four "basement" walls, drained at least 10' downhill from the SGH.
-
Put 2" termite-treated extruded polystyrene or extruded polyurethane on the insides of the walls, with a waterproof membrane on the outsides of the walls.
-
Cut 4" holes in the two culverts for connection to the 4" drain pipes. Cut 12" holes in the top-middle of one culvert for the fan duct and two 12" holes near the ends of the other culvert. Drill 1/2" drain holes on the inside halves of the two culverts.
- Put a water-level 12" perforated drain pipe from the bottom of the heat sink to just under the center of the walkway for checking the heat-sink water level and pumping out water when necessary.
-
Put the bottom drain pipes in the trench with 3/4" to 1" rocks below and around them, attaching the drain pipes to the bottom holes in the 6 " air-inlet vertical pipes at the west end and east end.
-
Install two temperature sensors at the level of the bottom pipe in the center and near the east or west edge.
-
Put the remaining two layers of drain pipes in the trench with crusher-run rocks around them, attaching these pipes to the remaining holes in the 6" and 8" air-inlet pipes at the west end and east end.
- It may be advisable to mix some of the dirt removed from the trench with the crusher run rocks for greater water containment.
-
Install three temperature sensors at the middle of the heat sink in the center and near the east and west edges.
-
Place a waterproof tarp, with 1/2" holes drilled on a 1' matrix, over the trenches to keep the planting soil from becoming waterlogged.
-
Install the fan in the inlet air duct and the pipe above it.
-
Put 1/4"-mesh screens over the air inlet and the four air outlets.
-
Replace the top soil, with perhaps a recession of 1' or more with treated-wood sides held by galvanized posts or 4" blocks for the walkways. It might be best to wait for a year before recessing the walkways.
-
Dig and pour the concrete for the foundation.
-
Put 2" termite-treated extruded polystyrene or extruded polyurethane on the outsides of the foundation covered with 1/4"-mesh galvanized screen.
-
Water proof the outside of the insulation/foundation with a membrane from the top of the foundation sloping downward out 10' from each side of the SGH, and install drainage around it.
- Cover the membrane with used carpeting before covering it with dirt to protect the membrane and to provide insulation between the air and the earth near the structure.
- Cover the carpet and membrane with top soil.
-
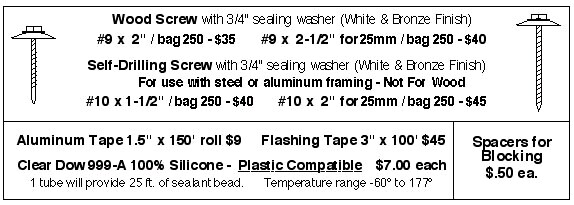
Build the SGH structure ( Framing guide) (Best to use cedar or cypress, instead of pressure-treated wood.)
- Paint the rafters and back wall white. Then apply a coat of marine varnish to the rafters to be in contact with the glazing.
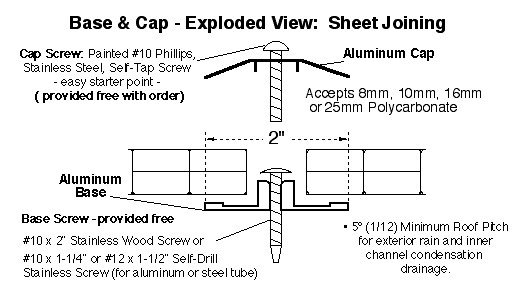
- Install the polycarbonate panels (Base & Cap install manual) (U Profile & Screws)
-
Install the two thermostats for the fan, GFI electrical outlets, lighting, and a water inlet.
- Install temperature, humidity and carbon-dioxide sensors at the east and west edges and the center of the SGH.
-
Use some of the trench dirt to build a berm on the north side of the building, with a vapor barrier between it and the siding.
Slide show about solar greenhouses using SHCS. |
| |
The modern version of the SGH using SHCS uses petroleum products; e.g, ADS drain pipes, polycarbonate glazing, Bluegard insulation and metal culverts. This is the best use of the remaining petroleum: using petroleum to create the infrastructure to conserve energy, which is much better than burning it.
Back to top
|
http://www.littlegreenhouse.com/guide.shtml:
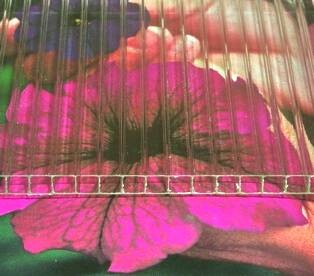
"One of the newest covering options, UV treated polycarbonate provides much of the clarity of glass and is stronger and more resistant to impact than other coverings. It is also more resistant to fire than other plastics. View picture of polycarbonate
Polycarbonate is available in several different thicknesses and normally comes in single, double, and triple walled sheets with many structural walls separating its two flat sides. Single wall polycarbonate is the least expensive and is generally used for its attractive appearance, but it lacks the strength, heat retention, and light diffusing properties of double and triple wall polycarbonate. The multiwall structure gives it greater strength and superior insulating values with the air space built into the product. Multiwall polycarbonate also provides your greenhouse with an even diffused light that minimizes shadow and is optimal for growing plants. Another advantage of polycarbonate is its +15 year lifespan in most areas. Triple wall is rather expensive compared to other covering options, but it will pay for itself in reduced heating costs in cold climates that require frequent heating.
Thinwall polycarbonate
One of the newest glazing options, UV treated polycarbonate is a rigid plastic which provides much of the clarity of glass but is stronger and more resistant to impact than other glazings. Polycarbonate comes in multiwall panels with many structural walls separating its two flat sides (looks similar to cardboard in design when viewed on edge). This structure gives it greater strength and superior heat retention with the insulating air space built into the product. Multiwall polycarbonate also provides your greenhouse with an even diffused light which is optimal for growing plants."
http://www.greenhouse-coverings.usgr.com/polycarbonate.html:
Multiwall Polycarbonate Sheets
Double Wall 
Triple Wall 
Four Reinforced Walls 
http://www.cedarbuilt.homestead.com/twinwalledpolycarbonate.html:
"Triple walled polycarbonate has a rib space 34% greater than double walled offering much higher clarity when viewing through. No other greenhouse kit manufacturer is offering this as standard glazing!
-Thermal Insulation: TripleWall channels trap air between 3 walls. Retains heat to help plants stay 10-20 deg.F warmer in winter. A savings of 45% off of the cost of heating a single-pane glass greenhouse.
-Weather Resistant: Able to withstand weather: storms, hailstones, wind, snowfalls, and ice formation. It stays strong, where glass fails. 10 yr manufacturers warranty against breakage, yellowing, and loss of light transmission.
-Light Transmission: Offers 86% light transmission while providing against UV radiation from the sun. The sheets have a UV-protected surface to give ensure against outdoor weathering. Sun rays are scattered by the ribs between panel walls to surround plants without shadowing or burning them. Less condensation and therefore more light transmission with little or no dripping from overhead.
-Light weight and Inexpensive: a far superior product because of the light weight properties, and much less expensive than heavy, double glazed tempered glass which can act as a magnifying glass to burn plants.
R-Values for polycarbonate: (the higher the R-Value, the higher the insulation value)
Standard 6mm triple walled: R-Value: 1.68; 16mm triple walled: R-Value: 2.58; 16 mm five walled R-Value: 2.98"
http://www.backyardcity.com/FAQs/FAQ-Det-Is-polycarbonate-the-72.htm:
"Is polycarbonate the best choice for a greenhouse? Well the vast majority of our customers think so! Polycarbonate gives you the "real greenhouse feel and look" without the cost of glass. And it lasts many more years than Polyethylene Film. Polycarbonate panels come in double walled sheets with many structural walls separating its two flat sides. Imagine a see through cardboard box. Virtually unbreakable polycarbonate is the same high-tech plastic used in aircraft windshields and helmets. Temperature extremes don't affect its impact resistance. Hail and baseballs bounce off. Its impact strength is 30 times greater than acrylic and 200 times greater than glass. After glass, polycarbonate is the most flame resistant glazing."
Sellers of Polycarbonate Panels:
Sundance Supply:
Type |
Thickness |
R Value |
Light Trans |
lbs/ft^2 |
Price/ft2 |
Width |
Length |
TwinWall |
6 mm |
1.6 |
83% |
0.27
|
$1.35 |
4' to 6' |
4' to 48' |
TwinWall |
8 mm |
1.7 |
82% |
0.35 |
$1.70 |
4' to 6' |
4' to 48' |
TwinWall |
10 mm |
1.8 |
80% |
0.41 |
$2.00 |
4' to 6' |
4' to 48' |
TripleWall |
16 mm |
2.5 |
76% |
0.57
|
$3.20 |
4' to 6' |
4' to 48' |
5Wall |
25 mm |
3.57 |
61% |
0.72 |
$4.65 |
4' |
4' to 48' |
|
Polycarbonate Needed & Cost |
Neighborhood Solar Greenhouse |
Backyard Solar Greenhouse |
Glazing area (ft^2): |
705 |
280 |
TwinWall 6 mm |
$951.75 |
$378.00 |
TwinWall 8 mm |
$1,198.50 |
$476.00 |
TwinWall 10 mm |
$1,551.00 |
$616.00 |
TripleWall 8 mm |
$1,762.50 |
$700.00 |
TripleWall 16 mm |
$2,256.00 |
$896.00 |
4Wall 8 mm |
$1,833.00 |
$728.00 |
5Wall 16 mm |
$2,798.85 |
$1,111.60 |
5Wall 25 mm |
$3,278.25 |
$1,302.00 |
|
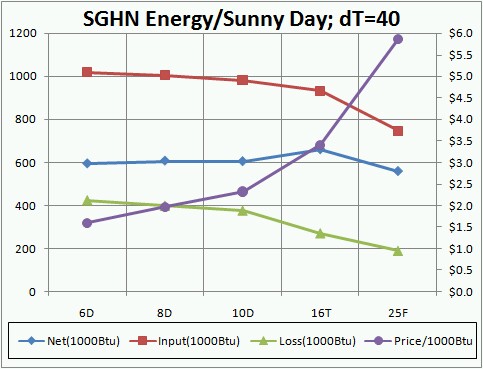
SGHN: |
|
Input=1740*A*%T |
Loss=24*U*A*dT=24*A*dT/R |
|
|
|
|
Sunny |
SGHN |
|
|
|
|
Thickness |
%T |
Input(1000Btu) |
Loss(1000Btu) |
Net(1000Btu) |
Net Ratio 6D |
Price/1000Btu |
6D |
0.83 |
1018 |
423 |
595 |
1.00 |
$1.60 |
8D |
0.82 |
1006 |
398 |
608 |
1.02 |
$1.97 |
10D |
0.8 |
981 |
376 |
605 |
1.02 |
$2.33 |
16T |
0.76 |
932 |
271 |
662 |
1.11 |
$3.41 |
25F |
0.61 |
748 |
190 |
559 |
0.94 |
$5.87 |
|
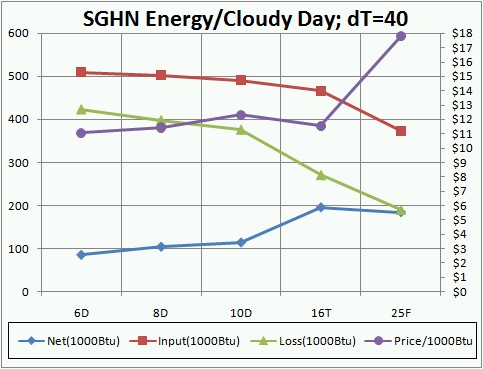
Cloudy |
SGHN |
|
|
|
|
6D |
%T |
509 |
423 |
86 |
1.00 |
$11.06 |
8D |
0.83 |
503 |
398 |
105 |
1.22 |
$11.43 |
10D |
0.8 |
491 |
376 |
115 |
1.33 |
$12.30 |
16T |
0.76 |
466 |
271 |
195 |
2.27 |
$11.54 |
25F |
0.61 |
374 |
190 |
185 |
2.14 |
$17.76 |
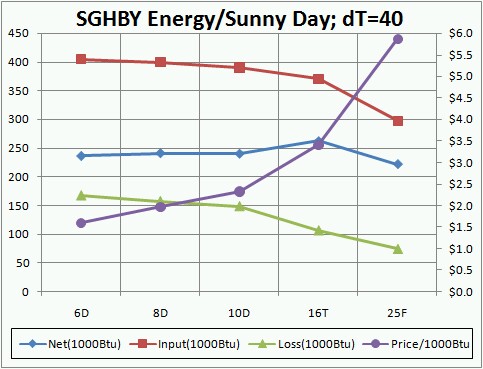
SGHBY: |
|
Input=870*A*%T |
Loss=24*U*A*dT=24*A*dT/R |
|
|
|
|
Sunny |
SGHBY |
|
|
|
|
Thickness |
%T |
Input(1000Btu) |
Loss(1000Btu) |
Net(1000Btu) |
NetRatio 6D |
Price/1000Btu |
6D |
0.83 |
404 |
168 |
236 |
1.00 |
$1.60 |
8D |
0.82 |
400 |
158 |
241 |
1.02 |
$1.97 |
10D |
0.8 |
390 |
149 |
240 |
1.02 |
$2.33 |
16T |
0.76 |
370 |
108 |
263 |
1.11 |
$3.41 |
25F |
0.61 |
297 |
75 |
222 |
0.94 |
$5.87 |
|
Cloudy |
SGHBY |
|
|
|
|
6D |
%T |
202 |
168 |
34 |
1.00 |
$11.06 |
8D |
0.83 |
200 |
158 |
42 |
1.22 |
$11.43 |
10D |
0.8 |
195 |
149 |
46 |
1.33 |
$12.30 |
16T |
0.76 |
185 |
108 |
78 |
2.27 |
$11.54 |
25F |
0.61 |
149 |
75 |
73 |
2.14 |
$17.76 |
|
|
Back to top
|
This thermostat is very accurate and can be used to control heating or cooling equipment. It has a NEMA 4X waterproof enclosure which was developed with harsh greenhouse environments in mind (it can even be used outdoors). The Ranco thermostat has a 8' (can be extended to 400') waterproof temperature sensor which allows you to control temperatures remotely, and it retains settings in memory in case of power failure. Unit also allows an appliance to be cut off when you do not want it to be thermostatically controlled. The current temperature is shown on the digital display when thermostat is on. Temperature range is -30° to 220° F (adjustable 1° F to 30° F differential). Can be used with 110/120 volt appliances (16 amp/110v max). Wiring required. Model # ETC-141000-000 $74.95
Two of these thermostats were purchased for the Blacksburg VA YMCA Solar Greenhouse. They are excellent. |
|
|
|
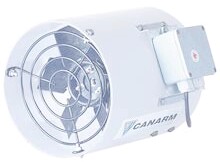
Vents
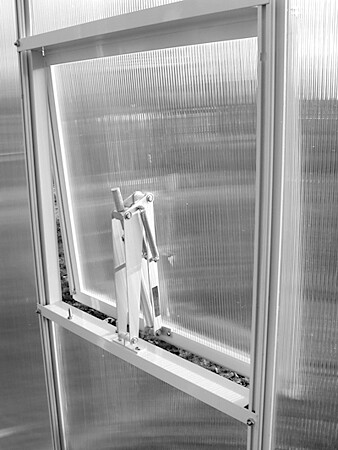
SolarGro Side Vent
Pipes for a Solar Greenhouse
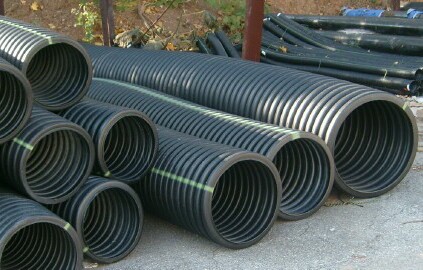
The 24" pipe on the right in the picture above is for the two ends. The 12" culvert in the middle left and top left is for the inlet on the east end and the two outlets on the west end.
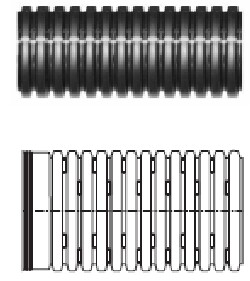
Locations of perforations:

A decision must be made as to which of the three kinds of perforated pipes to use. The one to use depends on the rock sizes to be used around the pipes. The muck and leach pipes have 21 holes every 2'; the holes are about 5.8" diameter, so the total hole area for 2' is about 2.05 in^2. The slotted pipe has about 144 slots every 2'; the holes are about 5.8"x1/16", so the total hole area for 2' is about 5.63 in^2. So my choice is #57 rock and the slotted pipe, perhaps with the slots or some of the slots widened a bit with some tool.
The perforated pipes are connected to the 24" pipes by an adapter (ADS part #0462AA):

Acco Stone of Adams Construction in Blacksburg VA has the following rock-sizes:
Rock code |
Rock sizes |
weight |
cost |
#57 |
3/8” to ¾” |
100 lb/ft^3 |
$9.55/ton |
#357 |
1.5” to 2” |
89 lb/ft^3 |
$8.75/ton |
I am inclining toward the #57 rocks and the slotted pipes, because the #357 rocks are too large for good capillary action to move water out into the sink from the pipes and some of the #57 rocks might tend to move inside the muck or leach pipes, whose holes are slightly larger than ½”.
The slotted pipes will allow more symmetric water and air flow out of and into the pipes and will admit less rock/dirt into the pipe.
The volume of the heat sink, minus the pipes volume is about 1300 ft^3 = 80 tons of #57 rocks = $764 plus trucking fee. More rock than this may be required because of the compacting of it as it is put in.
|
The 24' culvert comes in only 20' lengths. The SGHN needs 16' on each end. The cost of two 24" culverts 20' long is $916. One 12" curvert 20' long will do for the inlet pipe and the two outlet pipes. The cost is $72. There is a $10 delivery charge from Christiansburg VA to Blacksburg.
|
| The 4" perforated corrugated drain pipe is $0.35 per foot. The SGHN needs 25 pipes about 28' long each for a total length of 700', at a cost of about $245. |
The ADS catalog has details for the plastic pipes and fittings that are needed for the SGHN heat sink:
- 0406-0100’ muck coil of 4” pipe (2 of these)
- 0406-0250’ muck coil of 4” pipe (2 of these) for a total of 700’
- (no number given) 24” single wall corrugated pipe (about 34’ total)
- 2401AN N-12 fabricated end caps for 24” pipes (4 of these)
- (no number given) 12” single wall corrugated (about 15’ total for vertical pipes)
- 0462AA 4” clay adapter (used to connect the 4” pipes to the 24” pipes) (50 of these) (I saw these at Lowe’s. I will get one to study how best to do the attachment.)
- 1268AG 12” N-12 adapter (used to connect the 12” vertical pipes to the 24” horizontal pipes) (3 of these)
|
Dow Extruded Polystyrene Insulation for a Solar Greenhouse

|
| The 2" thick 4'x8' panels come with either a square edge or with shiplap edge. The R value is 10. It is termite resistant; that is, termites cannot tunnel through it to get to wood. Its compressive strength is 25 psi. |
| 4'x8' piece is $34. According to Lowes, must buy in lots of 22 pieces (704 ft^2): $748. |
For a neighborhood SGH: Need about 450 ft^2 for around the foundation and the heat sink.
So the lot of 22 pieces will do for $748. (Need to check with other sellers for a possible smaller lot.)
|
| For a back-yard SGH: Need about 270 ft^2 for around the foundation and the heat sink. |
Here are some links to products that might be used to build the SGH:
-
-
-
Foamular Rigid Foam Insulation to insulate the bottom of the heat sink from the earth under it. Foamular is hydrophobic, “practically impossible for it to be penetrated by moisture. (However, I think that one should put a 4-mil film over it before starting to building the heat sink.)
.) The question is: How thick should the Foamular be?: 1” = R5, 1.5”=R7.5, 2”=R10.
Cistern for Capturing Rain Water from the Greenhouse Roof
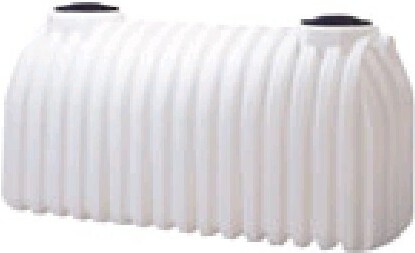
This tank must never get below 1/4 full.
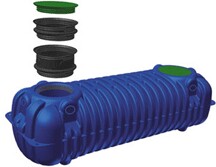
This tank can be empty without causing problems.
-
Plants prefer rainwater.
-
Storing water for watering the plants below ground in a cistern, whether it is rain water from the roof, or water from another water supply, brings the water to ground temperature, which is a desirable temperature for the plants.
-
A drip irrigation system conserves water.
-
One ft^3 of water equals 7.43 gallons; therefore, every ft^2 of roof produces 7.43 gallons of water for every 12" of rainfall.
-
About 25% of the water hitting the roof is evaporated before getting to the cistern.
-
Annual rainfall for Blacksburg Virginia is about 40" per year. For this amount of rainfall, the cistern should be sized to hold about 1/4th of the water hitting the roof in a year.
-
The neighborhood solar greenhouse roof is about 576 ft^2; so it collects about 0.25*576*7.43*40/12=10,700 gallons per year. Rounding to the next higher 1000 gallons, the cistern should hold 3000 gallons. Economics and space may indicate a tank half that size with an overflow that takes the excess water well away from the SGH. The overflow should have a screen on it to prevent mosquitoes and small animals from entering the cistern.
-
The backyard solar greenhouse roof is about 200 ft^2; so its cistern size should be about 3000*200/576 or about 1000 gallons. Economics and space may indicate a tank half that size with an overflow well away from the SGH.
-
The cistern should have an overflow drain directed far away from the SGH., say 10' or more and downhill. It should have a screen over the outlet to prevent small animals from entering the cistern.
-
The cistern inlet should have a filter: "The filter is a concrete enclosure that's divided into two sections by a partition reaching two-thirds of the way to the chamber's top. One of the two sections is left empty, while the other is layered full of filtering materials, usually gravel, fine sand, and/or activated charcoal. As water flows from the downspout to the empty section of the filter box, bits of leaves, dirt, etc. will settle out; then, as the collected liquid spills over the partition and begins to percolate down through the layers of filtering material, smaller impurities also will be removed. A screen prevents any remaining debris from flowing into the supply line that connects the filter box with the cistern." (
The Homestead Cistern).
-
If a cistern is not used to capture rain water from the SGH roof and glazing, the roof runoff must be channeled far away from the SGH, say 10' or more and downhill..
Water Filter leading into the cistern:
Here are some very nice downspout filters at very high prices. I like this one:
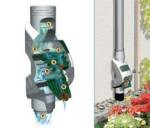
8-16 RainKeeper Downspout Filter
"Perfect for smaller systems with a maximum roof area of 115 m2 (per downspout). Leaves and debris are continuously and reliably filtered out through a unique two stage cascade filter. Water flow is not altered as rainwater enters the top of the filter and exits the bottom with dirt and debris being discharged out the front. Installed in the lower section of the downspout for easy monitoring and discharge of debris. Filter unit is easily removed for cleaning. Housing and inner parts are made of high quality, recyclable, PE plastic with the filter material made from 550mm stainless steel mesh. SHIPPING NOT INCLUDED WITH PRICE. Price: $270." The SGH needs two of them, one for each side of the roof. The screen has 0.5 mm openings. Here is a lower price for it: $210.
One could make an in-ground filter, for both downspouts, much cheaper:
A 2’ wide x 3’ long x 1’ deep empty box and a triangle box with 1.5’ sides connected to the rectangular box on the downstream 2’ side separated by an 8” high wall between them. The incoming water drops big items into the rectangular box before the water passes through a screen above the 8” wall into the triangular box. The triangular box is filled with 8” of pea gravel (round gravel about the size of peas) with a screened outlet that leads to the cistern at the bottom near the pointed end. It would need to be some distance below ground level to keep the water from freezing and have an insulated cover that can be removed for cleanout.
Cistern filter: 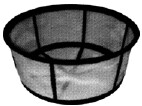 1-mm openings, $32
Cost of some items for solar greenhouses |
|
|
|
|
|
Neighborhood SGH |
Backyard SGH |
| Polycarbonate: |
$2,000 |
$1,000 |
| Underground Insulation: |
$450 |
$270 |
| Plastic Pipes: |
$1,300 |
$700 |
| Cistern: |
$1,500 |
$750 |
| Total Hydrocarbons: |
$5,250 |
$2,720 |
Growing Vegetables in a Solar Greenhouse
|
Expert advice for greenhouse growing (Mother Earth News):
Care for the soil: Using compost in the greenhouse is a good idea; it will help boost the microbial populations in the soil. Mulches have benefit, too. They will moderate the temperature in the soil, conserve moisture and decompose over time to increase fertility. There are advantages to leaving the greenhouse soil fallow over the
summer: The soil “solarizes” in the intense heat, which burns off soil pathogens and will desiccate even the most die-hard slug. Avoid overfertilizing with nitrogen. Green leafy crops can accumulate
unhealthy levels of nitrates, especially in the low light conditions of
a winter greenhouse. Use plant-based rather than manure-based
(higher in nitrogen) composts.
Winter gardening strategy: The greenhouse protects plants from winter extremes not only by slowing temperature changes but also by keeping wind and cold rains at bay. Plants such as lettuce are not bothered much by freezing air temperatures. They have learned a neat little trick to survive, which is unsettling the first time you see it: As air temperature drops, the plants move water out of their cells into the intercellular spaces, so that freezing doesn’t disrupt the cell walls. The leaves go limp (and the frantic gardener assumes the crop is lost) — but then they perk back up as the sunlight warms the greenhouse and the cells rehydrate. The more critical factor is to prevent freezing deep into the root zone — this is the key to successful winter gardening. You could think of the soil inside the greenhouse as a rechargeable battery. During the day, it charges from the heat energy of the incoming sunlight. At night, it quickly loses that stored energy, but it has a huge amount of heat to lose before the soil starts to freeze.
Experienced gardeners might have some difficulty adjusting to the paradoxes of winter gardening. We have to relearn many of our assumptions, particularly about scheduling crops. Unlike in spring, when the season is opening out into greater warmth and longer days, in the fall it is shutting down into increasing darkness and deeper cold. The biggest challenge will likely be the shorter day length, rather than the lower temperatures. The bad news: During the darkest time of winter, there is insufficient solar energy to support vigorous growth. If you start your plants too late to accomplish most of their growth before the short days, they will survive the cold temperatures, but instead of growing actively, they will sit and sulk, awaiting sunnier days. The good news: On the other hand, if you get the timing right, you can produce, say, a mature head of lettuce before the darkest days and it will stay fresh much longer than in the summer. That perfect head of lettuce that would spoil within a matter of days in June will stay in prime condition for two or even three months in the middle of winter. When you start your crops in the late summer or early fall, start far more than you think you will need. As you harvest, you will not be able to start new crops, but if you have plenty “in the bank” at that point, you can continue making generous harvests until longer days make possible some late-winter crops.
Greenhouse crops: (Start greenhouse crops in the outside garden, then move them into the greenhouse when needed.) The greenhouse is simply too hot for direct sowing in late summer and early fall, when most winter crops need to be started. Salads. Lettuces are quite resistant to frost, though not as cold hardy as some other winter garden plants. In the chill and reduced light of the winter greenhouse chicory’s bitterness is tinged with sweet, and the stringy toughness is replaced by a delightful juicy crunch. (An unusually good source for chicory seeds is Seeds from Italy.) Lesser-known salads include mâche and edible chrysanthemum. Some are astoundingly cold hardy, such as claytonia (or miner’s lettuce) and minutina (Herba stella). And don’t forget scallions as an easily grown addition to winter salads. Cooking greens. Spinach is extremely cold hardy. Make several sowings during the winter growing season. Plant crucifers, including mustards, raab, Oriental greens such as bakchoi and tatsoi. Chard (or Swiss chard) is a type of beet bred for its large tender leaves and rapid re-growth, rather than its roots. It is cold hardy and productive. Green onion and garlic tops also make great cooking greens. Brassicas that head (such as cabbages and broccoli) are more likely to develop large, tight heads if grown in the late-winter greenhouse rather than in the fall. Loose leafed kale, however, is an excellent crop for the fall-winter greenhouse if you start your transplants early enough. Get an early start. Root crops such as beets or carrots are not suitable for planting in the fall greenhouse; they will grow, but do not receive sufficient energy in the shortening days to “make root.” Excellent results can be had growing carrots, beets, potatoes and daikon (as well as the smaller radishes) in late winter, and harvesting these crops up to two months earlier than their siblings in the garden. Use the greenhouse to give an early start to tomatoes, peppers and eggplants. Move the fastest-growing plants outside when the season has advanced enough, and harvest ripe fruits a month early. (A few tomato plants grown in the greenhouse itself offer those first vine-ripened tomatoes even earlier.)
More techniques: Know when to water. It’s best to water deeply from time to time in lieu of frequent shallow waterings. Water in the morning to give the plants plenty of time to dry before temperatures fall at night. Avoid overwatering, which makes plants “sappy,” less able to withstand cold and other stresses, and less flavorful and nutritious as well. Test the soil with your finger: As long as you feel good moisture half an inch deep or so, it’s better not to water. Encourage natural ventilation. A closed greenhouse gets surprisingly hot on a sunny day, even if the temperature outside is quite cold. Don’t stress your plants by leaving the doors to the greenhouse closed when it’s sunny. Good ventilation is important for disease prevention as well. Balance your insects. Insect management is not so much about control, as it is about balance. Plant flowering plants to provide pollen and nectar that attract lacewings, ladybugs and other beneficial insects. Beneficial insects seem to migrate out of the greenhouse into the garden as it starts to bloom, boosting insect diversity there.
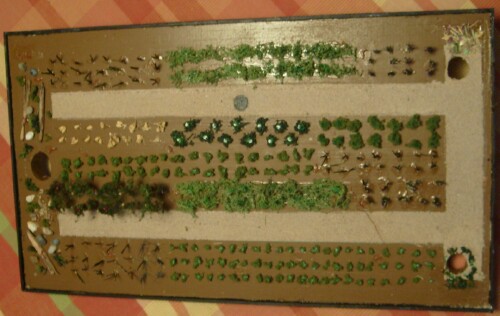
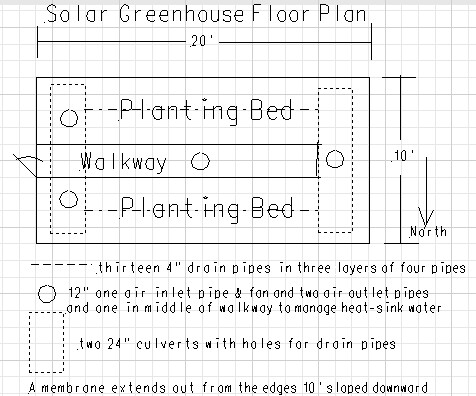
Possible plants layout for the neighborhood solar greenhouse:

Of course, plant types need to be rotated to different places in the greenhouse from year to year.
The last chapters of the book The Solar Greenhouse Book by James C. McCullagh, 1978 give much information about crops to grow in a solar greenhouse. Here are some excerpts:
- Carbon dioxide: Outside air contains 0.03% CO2 . Plants benefit from 0.03% to 0.1% CO2 . A way must be found to continuously supply CO2 . There is a considerable potential for CO2 supplementation through composting in the SGH. Compost temperature should reach 140°F to 160°F, which also will help the greenhouse stay warm. Slow air movement distribute the CO2 around the SGH.
- Most plants grow best when the relative humidity is between 30% and 70%.
- Water sparingly in the winter, because excess water will evaporate and rob energy from the air.
- The soil should be a combination of loamy soil, organic matter (compost and peat) and course aggregates (vermiculite, perlite, sand).
- Soil temperature should be between 50°F and 70°F.
Mark Steel, my friend in Floyd county, has some useful web pages about growing food:
Links:
|
|
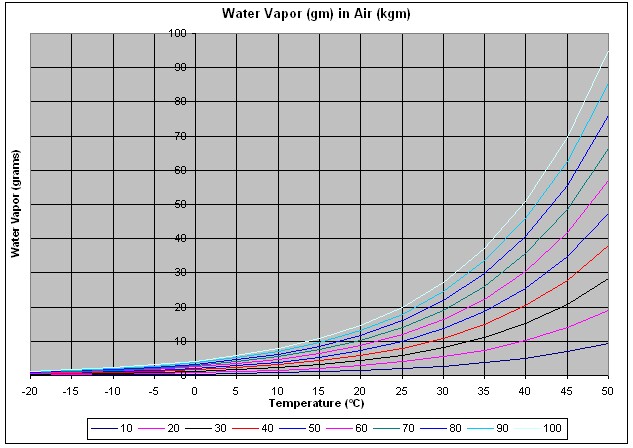
Using a humidity calculator, an accurate formula for calculating the amount of water vapor (in grams) that is in air (in kilograms) is
w = 0.042 H exp(0.06235 T),
where W = water in grams per kilograms of air, H = % relative humidity and T = temperature in degrees Celsius.
(The saturation [H=100] formula is
ws = 4.20 exp(0.06235 T)
Plotted curves:
Using this formula and converting to Fahrenheit with F = 9C/5 + 32:
Back-yard solar greenhouse: Moving 5 times the greenhouse air volume under the planting beds such as to change the air temperature from 70° F at 70% humidity to 60°F at 40% humidity would heat 16 gallons of water per hour from 50°F to 70°F.
Neighborhood solar greenhouse: Moving 5 times the greenhouse air volume under the planting beds such as to change the air temperature from 70° F at 70% humidity to 60° F at 40% humidity would heat 56 gallons of water per hour from 50°F to 70°F.
|
The SHCS SGH will operate at maximum efficiency when the difference in energy per mass stored in dry air and the water vapor between the air inlet and the air outlets is maximum. (Air pressure is assumed the same at the inlet and at the outlets.) The energy/mass stored in dry air is
Eair = 1.00464 T [kJ/kg°C] and the energy/mass stored in water vapor is Ewatervapor = w (1.846 T + 2502), where w = (vapor mass)/(dry air mass) in kg/kg. However, w is usually measured in g/kg, so the equation is then Ewatervapor = w (0.001846 T + 2.502). Approximately, in terms of relative humidity, H, w = wsat H/100 = 0.0420 H exp(0.06235 T), where wsat= w at saturation. So the total energy per mass of air/water-vapor at either the air inlet or the air outlet is
E = Eair + Ewatervapor = 1.00464 T + 0.0420 H (0.001846 T + 2.502) exp(0.06235 T) [kJ/kg]
This energy per mass of air is relative to the definition of zero energy at temperature 0°C and 0% humidity. So, the energy can be less than zero.
References:
Given the temperature T in °C and the relative humidity H, the equation above for the total energy is calculated at the entrance and exit air inlets. Then the speed of the air fan is varied until the difference between the two energies is a maximum. Ideally, this calculation would be done every minute to adjust the fan speed; realistically, it will probably be done for a long interval of time and then the fan speed would be adjusted to an average.
It is desired to calculate the energy per time (power) stored in the heat sink. The density of the air/water-vapor and the air flow are needed. The density is calculated by taking the average of the temperature and the average of the relative humidity at the heat-sink inlet and outlet. The equation for the density is
d = {352.987-0.8043*H*10^[7.5*T/(T+237.3)]}/(T+273.15), where T is in °C.
The power is (air flow; volume/time)*(energy/mass)*(density; mass/volume) = energy/time
(This "energy content" is termed "enthalpy".) |
The dew-point equation is
Td = [abT+b(b+T)ln(RH/100)]/[ab-b+T)ln(RH/100)] |
a = 17.271, b = 237.7, T = deg C, Td = deg C |
|
Growing Worms in a Solar Greenhouse to Supply Carbon Dioxide
There is a need for supplying carbon dioxide to the plants growing in the green house. Some greenhouses use rabbits, poultry, or fish to convert oxygen into carbon dioxide. This plan uses a simpler system utilising earthworms and partially-composted organic material regularly brought into the greenhouse. (Also, pest predators can help convert oxygen into carbon dioxide.)
- Lumbricus rubellus: Also known as red worm, red wiggler, and other common names. The most popular earthworm species for commercial production. Can be raised indoors or outdoors. Color is maroon. Grows to length of 2 to 5 inches. Very good for composting as they work fast. They don't mind living in crowded conditions. That is good, because more active earthworms mean better
soil faster. (Sherry's Greenhouse Worm Page)
- Composting with Redworms
Establish worm farms, fed by partially-composted organic material, over the 24" pipes at each end of the SGH. The worm beds should be sufficiently large to supply worm-castings finished compost to the rest of the greenhouse. Their purposes are to supply carbon dioxide to the plants, which they manufacture using the oxygen supplied by the plants, and to finish composting for the plant bed soil. Thus, there is a closed oxygen/carbon-dioxide cycle, fed by the organic material (partially composted) brought into the greenhouse. The worms will probably need to be moved outside during the hottest parts of summer.
Composting for a Solar Greenhouse
To feed the worm beds in the SGH, the compost brought into the SGH should be about 2/3 finished, so that the worms can finish the composting and then the finished worm-castings compost can be used on the planting beds.
A compost bin should be near the SGH. I highly recommend having two tumbler composters, so that one can be finishing while the other is being loaded regularly.
Controlling Pests Naturally
Some pest predators recommended for inclusion in solar greenhouses are lady bugs, praying mantises, toads and lizards. They can help the worms convert oxygen into carbon dioxide. Toads and lizards will need a small water dish. Possible lizards are the Asian long-tail, green anole and blue-tailed skink.
Crop rotation among the different areas of a SGH helps control pests. Plant the same plant in different areas. Scatter plants that have odors repellant to insects, such as garlic, mints, chives, onions, marigolds and spices.
Community Greenhouses |
|
Neighborhood Solar Greenhouses in the New River Valley VA
|
Here are some ideas for a possible network of neighborhood solar greenhouses in the New River Valley of Virginia to allow growing vegetables during the winter:
- At a local nursery with planting beds for lease to local farmers.
- In several neighborhoods owned and managed by the neighbors.
- On Town of Blacksburg property for use by citizens.
- On Town of Christiansburg property for use by citizens.
- On City of Radford property for use by citizens.
- On YMCA of Virginia Tech property for use by citizens.
- On Virginia Tech property for use by students and faculty.
- On Radford University property for use by students and faculty.
- On New River Valley Community College property for use by students and faculty.
Such a network could share knowledge and experiences to make growing food in the New River Valley an important part of the effort to reduce dependence on petroleum and reduce global warming. |
Related Housing Heating
Books about Getting Food Locally
- Eating Oil: Energy Use in Food Production by Maurice B. Green, 1978.
- Food Not Lawns: How to Turn Your Yard into a Garden and Your Neighborhood into a Community by H. C. Flores, 2006.
- The Omnivore's Dilemma: A Natural History of Four Meals by Michael Pollan, 2007.
- How to Eat Without Petroleum by Colleen Carroll, 2007.
- Animal, Vegetable, Miracle: A Year of Food Life by Barbara Kingsolver, 2007.
References
Back to top
L. David Roper
http://www.roperld.com/personal/roperldavid.htm


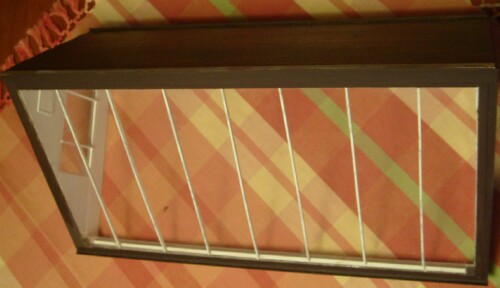
 This is the heat sink below the ground.